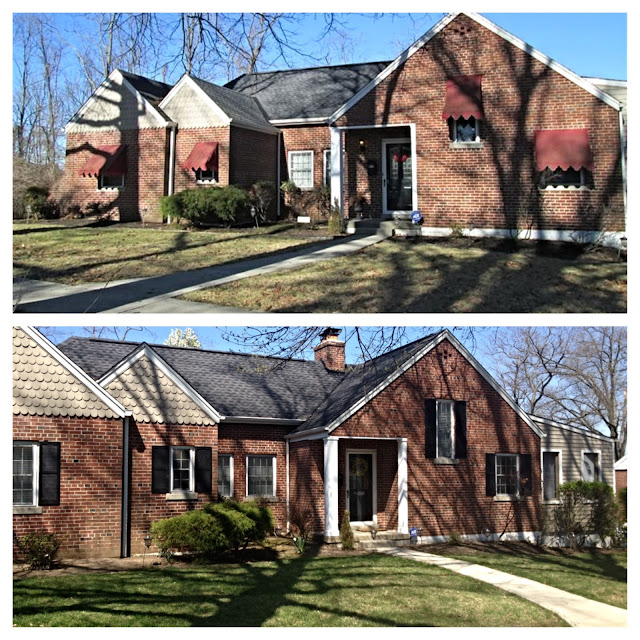
When we first purchased our home, there were these very dated red awnings on almost every one of the windows on the front of the house. I hated them from the first time I saw them and knew they would be the first thing to go. You can see in the pictures below, they really dated the house. The awnings made the house look so dark and dingy. They were old, dirty and outdated.
I'm pretty sure it was the day we got the keys to our house that I asked (nagged) my husband to rip them down. Taking them down took no time, just a little elbow grease and patience. In as short as 5 minutes, the front of our house looked instantly different. I felt like just removing the awnings had brought our house into the 21st century and I was ecstatic...for about 15 minutes. Then I decided, we NEEDED shutters. Now it looked too plain and empty. Plus, I love the look of shutters on a house. I feel like it adds such southern charm to a home. My husband and I did some research and decided on going with black plastic shutters from Lowe's. I love the look of wooden shutters but plastic doesn't rot and they tend to hold up better (according to my research, not experiences). Heres the link to the shutters we purchased. We've been very happy with them. They come in packs of two and have various colors and sizes to match any window size. http://m.lowes.com/pd/Severe-Weather-2-Pack-Black-Louvered-Vinyl-Exterior-Shutters-Common-55-in-x-15-in-Actual-54-5-in-x-14-5-in/3666544
After we purchased the shutters, it was time to assemble them. This, was not such an easy task. There was definitely some trial and error that went along with this project. At first, we lined to shutters up with the windows. Makes sense, right? Well what we quickly realized was that the pilot holes (the pre-drilled holes that are an item that you use to help know where to drill) did not line up with the mortar of the brick. We didn't think this was a problem until we burnt out about 3 drill bits by trying to drill into the actual brick...It took about 45 minutes for me to realize, DUH! Let's drill into the mortar, not the brick! After that, we finally starting making some progress. Some of the pilot holes lined up with the mortar, some did not. For the ones that didn't, we just drilled new holes into the shutters and you honestly cannot tell, especially from a couple feet back. Overall, the project took an afternoon, a lot of patience and some trial and error but we are over the moon about the outcome! I feel like it has made such a huge difference in the curb appeal of our home and it's amazing how much brighter the inside of the house is now that they are gone! Here are some close ups of the shutters.
Now, the after. Every time I compare the pictures, I cannot believe the difference it made. I am so glad we decided to remove the awnings and add the shutters. We also ripped out a lot of the old landscaping and planted new flowers. We used primarily impatience because our front yard is so shady due to the large trees they were some of the only flowers we could find that needed full shade. We also ripped out the white fence on the side of the driveway which I never really understood anyway. It reminded me of a ranch and just looked out of place.
Besides that, I added some potted plants, a new wreath and a cute little bench on the front porch that I picked up from a local antique show. I feel like all of these together have really added a lot of curb appeal to our home!
Besides that, I added some potted plants, a new wreath and a cute little bench on the front porch that I picked up from a local antique show. I feel like all of these together have really added a lot of curb appeal to our home!
Next blog post, I'll share some of the renovations we've done to the inside of our old Kentucky home.


No comments:
Post a Comment